
Authentication
Secure your webhook with a static token or HMAC SHA-256, including presets for Stripe, GitHub, Shopify, Slack, Typeform and Calendly.
Anyone who knows a webhook URL can send it a request, so authentication is what stops a stranger firing your Shopify Flow workflows. Set it per webhook, under the webhook's Security section.
The three methods
| Method | How the caller proves itself | Use it when |
|---|---|---|
| None | Nothing | Testing only - never in production |
| Static token | A fixed secret in a request header | Almost every integration (n8n, Make, Zapier, your own code) |
| HMAC SHA-256 | A signature computed from the request and a shared secret | The sender signs its webhooks (Stripe, GitHub, Slack, …) |
Static token
Press the generate button on the webhook to get a strong random token, or paste your own. The caller sends it in a header:
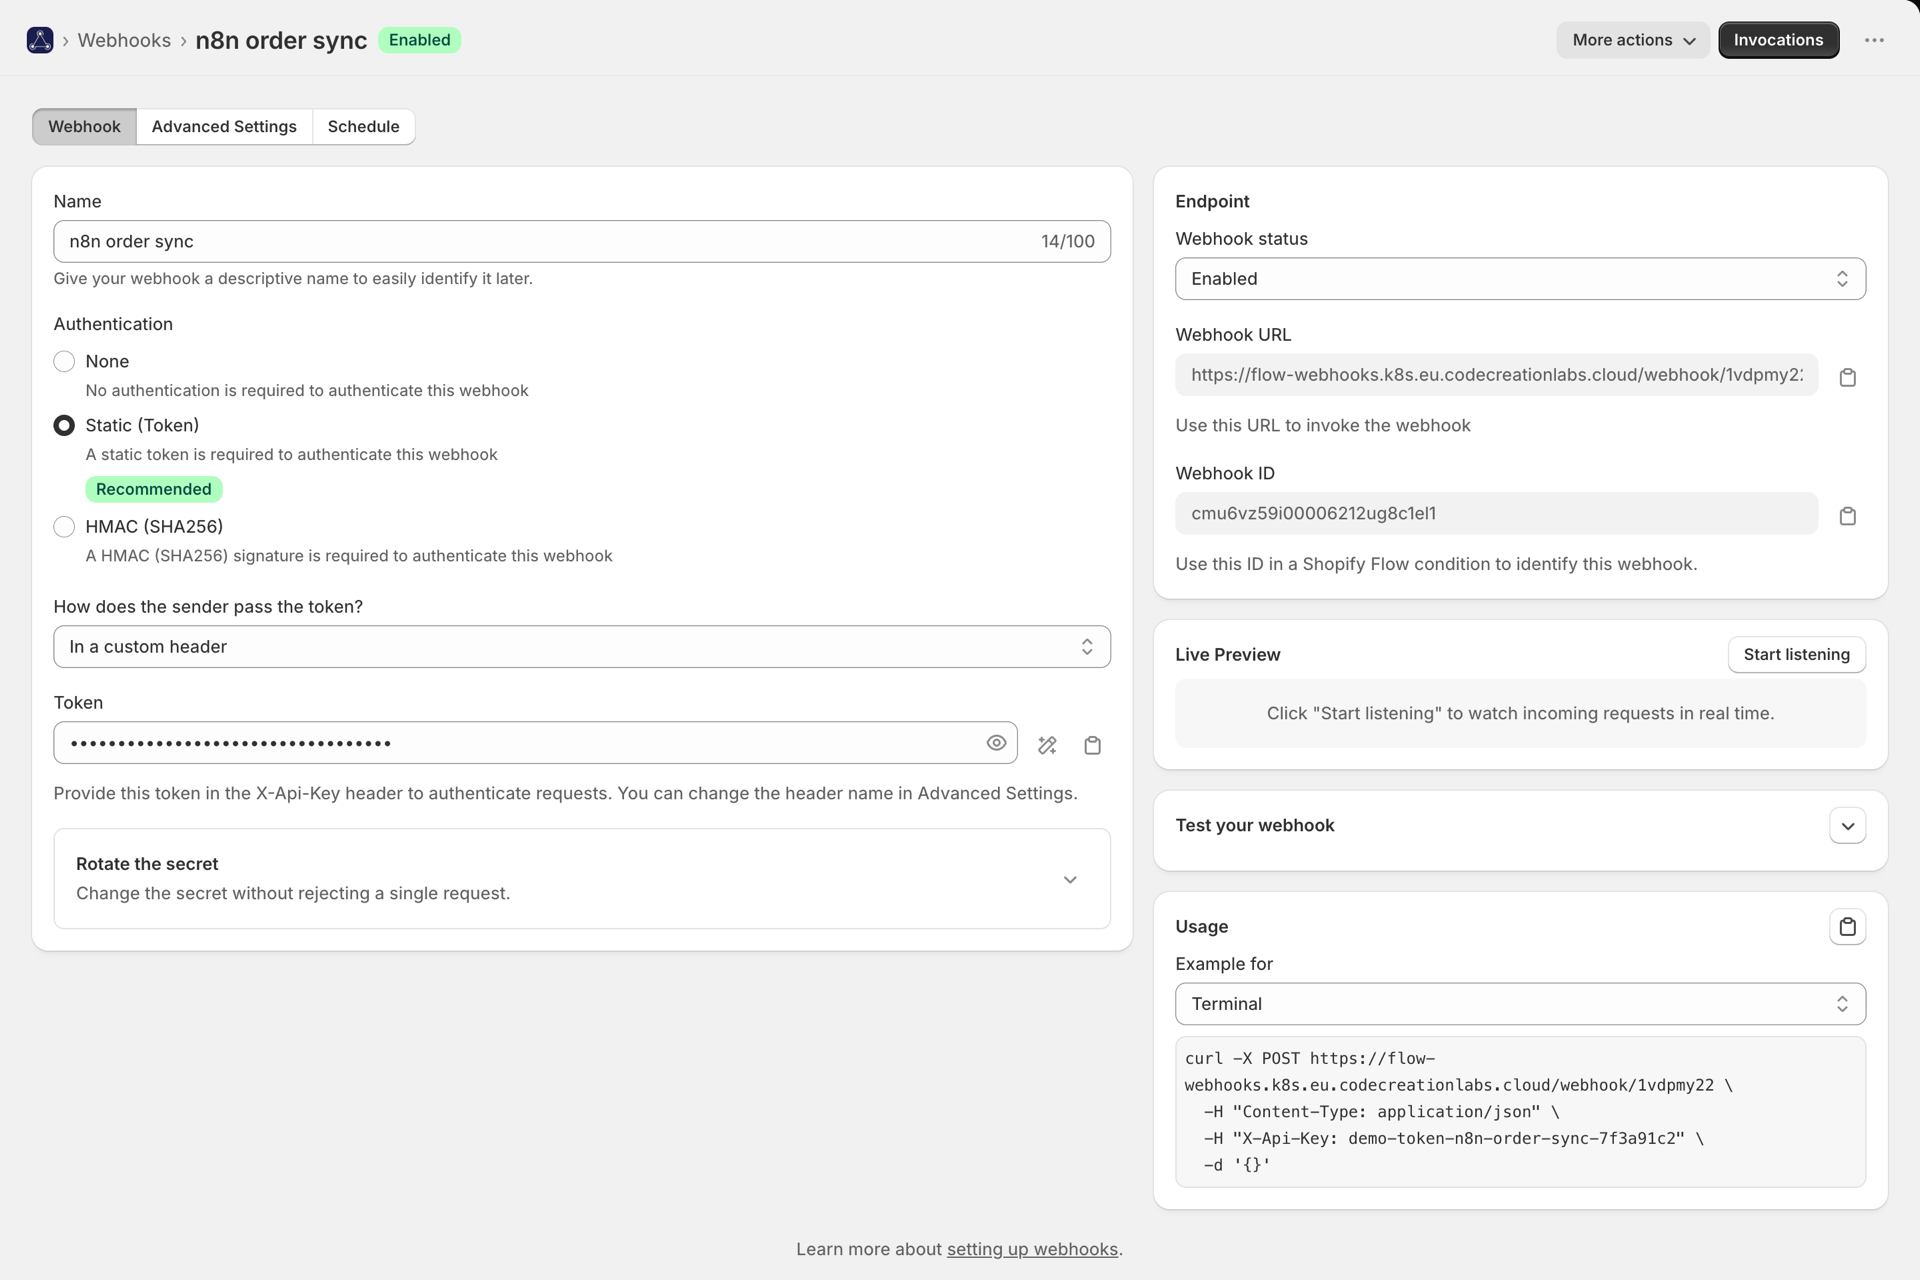
curl -X POST https://your-app-url/webhook/ab12cd34 \
  -H "Content-Type: application/json" \
  -H "X-Api-Key: your-token" \
  -d '{"orderId":"1001"}'
Changing the header name
Some systems can only send a header they already use. Set Auth header name in Advanced
Settings and we read the token from that header instead of X-Api-Key:
-H "X-Custom-Auth: your-token"Header names are case-insensitive. Reserved names are rejected - Host, Authorization,
Cookie, X-Forwarded-*, X-Webhook-*, CF-* and similar. Those are set or rewritten by
proxies and CDNs, so a token read from one would be attacker-controllable.
Where the token travels
Not every sender can add an arbitrary header. How does the sender pass the token? on the webhook tab offers four places:
| Choice | The sender sends | Use it when |
|---|---|---|
| In a custom header | X-Api-Key: <token>, or the header name you pick |
The default, and what most integrations do |
| As a Bearer token | Authorization: Bearer <token> |
The tool has a Bearer or API-token field |
| As username and password | HTTP Basic, with a username you choose and the token as the password | The tool only offers Basic auth |
| In the URL | ?token=<token>, or the parameter name you pick |
The sender can only call a plain URL and cannot set headers |
Authorization stays a reserved custom header name on purpose: Bearer and Basic are the
supported ways to use it, and both are handled for you. A 401 on those two also carries a
WWW-Authenticate header, because several HTTP clients only send credentials after being
challenged.
The URL option is the weakest of the four - URLs end up in logs, referrers and browser history - so use it only when the sender leaves you no choice. The app shows the finished URL with the token in it, and masks that parameter everywhere it stores the request.
HMAC SHA-256
The sender computes a signature over the request using a shared secret; we recompute it and compare. A leaked request cannot be replayed with altered content, because the body no longer matches the signature.
Provider presets
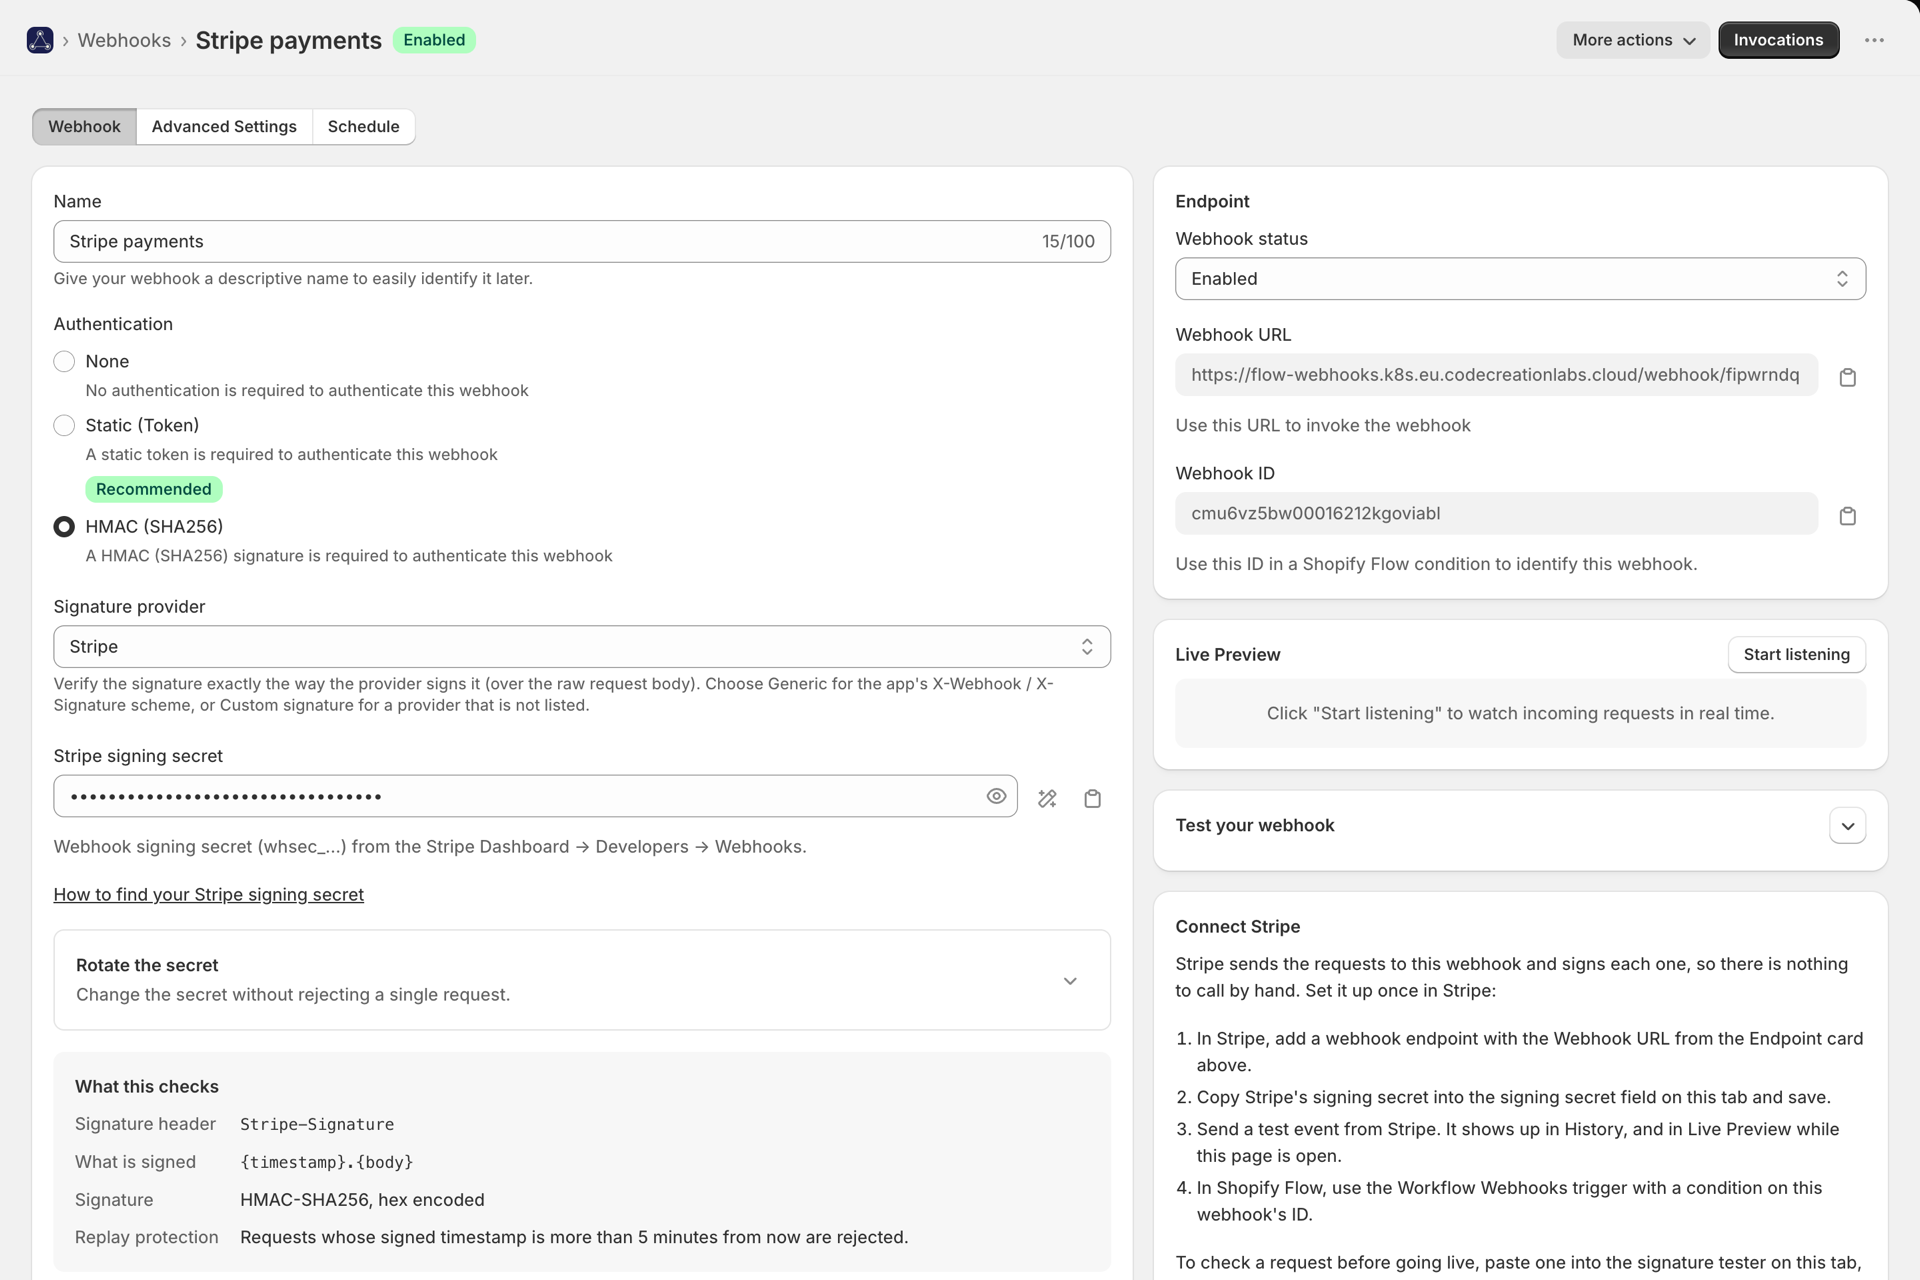
Pick your sender under Signature provider and we verify using that provider's exact scheme - header name, encoding, what is signed and how long a signature stays valid. Paste the signing secret from its dashboard and you are done.
There are 22 built-in providers, each with its own setup guide: Calendly, Customer.io, GitHub, Lemon Squeezy, Linear, Mollie, Paddle, Paystack, Razorpay, Sanity, Sendcloud, Sentry, Shopify, Slack, Square, Standard Webhooks (OpenAI, Supabase), Stripe, Svix (Clerk, Resend), Typeform, Vercel, WooCommerce and Zendesk. If yours is not there, describe how it signs with a custom scheme.
See Verifying signed webhooks for the full list, the custom option and the built-in signature tester.
Generic HMAC
With no preset and no custom scheme, we use our own: the caller sends X-Signature, the
HMAC-SHA256 of the X-Webhook-* header values using the signing secret.
curl -X POST https://your-app-url/webhook/ab12cd34 \
  -H "Content-Type: application/json" \
  -H "X-Webhook-Data: value1value2" \
  -H "X-Signature: <hmac-sha256 of the X-Webhook-* values>" \
  -d '{"data":"payload"}'
What a rejection looks like
Failed authentication returns 401 with a JSON body naming the reason - see
History and troubleshooting for the full code list. Rejected calls still appear
in the Live Request Inspector while you are editing the webhook, so you can see exactly why
one bounced.
Rotating the secret without downtime
Changing a secret in one step means every request signed with the old one fails until the sender catches up. Rotate the secret on the webhook avoids that: it holds a second valid secret that is accepted alongside the main one, for the static token and for every signature scheme.
- Put the new secret in Second valid secret and save. Both are now accepted.
- Switch the sender over to the new secret.
- Press Promote, which moves it into the main field and clears the second, and save.
No request is rejected at any point. The second secret is stored exactly like the main one, and is never returned by the API - only whether one is set.
Keeping the secret safe
- The token is never returned by our REST API or MCP server at any access level - they report only whether one is set. See Developer API and MCP.
- It is encrypted at rest.
- Rotating it takes effect immediately, so use the second-secret flow above rather than overwriting the main field.
- Stored invocation history masks the auth header, the Basic credentials and the URL token, so a screenshot of History does not leak your secret.
Narrowing it further
Authentication proves the caller knows the secret. IP allowlists restricts where a call may come from, and can be combined with any of the modes above.